Working with shaders
In 3D graphics, shaders are essentially programs that describe a behaviour about a pixel or vertex. Vertex shader runs for every vertex of the mesh, whereas a pixel shader runs for every pixel of the object.
You can think of pixel shaders as HTML5 canvas. You can manipulate the color of every specific pixel. In this blog, we will focus mainly on Pixel Shaders.
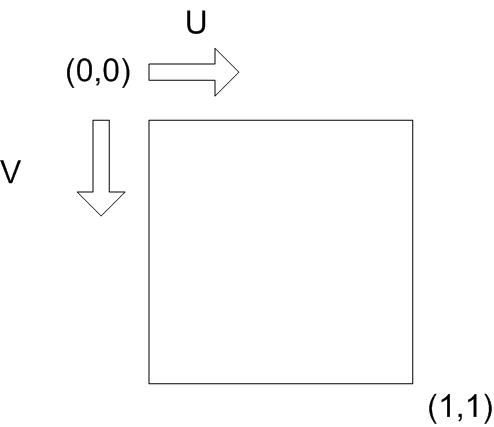
The UV coordinates
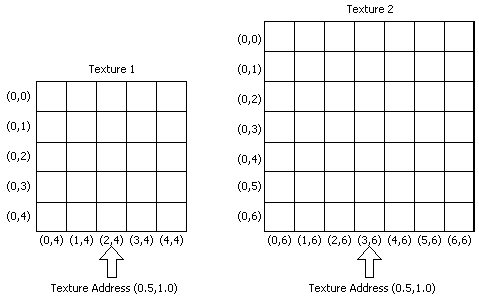
Pixel shaders coordinate system is standard coordinates are normalized to fit in interval {0,1} so that the pixel shader could scale for any random texture, which is essentially a color map, i.e. it explains which pixel gets what color.
A pixel Shader can then take input of any texture irrespective of its size.
You can quickly write pixel shaders on SHADERTOY. You can focus on writing shaders as it handles the pipeline for you. You write the code in essentially GLSL; there are a few differences, but it’s nearly the same thing.
Circle
Since this assumes no prior knowledge of writing shaders, I thought the first example should be explained thoroughly and built from scratch. If you have written shaders before or are familiar with the structure, here is the code
void mainImage( out vec4 fragColor, in vec2 fragCoord )
{
    // Getting the uv coordinates
    vec2 uv = fragCoord/iResolution.xy;

    // This gives the length of uv
    float dist = length(uv);

    // Initializing col with black color
    vec3 col = vec3(0.0,0.0,0.0);

    // Initializing a radius
    float radius = 0.5;

    // Starting an if block
    if(dist < radius)
    {
        col = vec3(1.0,1.0,1.0);    // Setting col to white
    }

    // this sets fragColor which is our retrun value
    fragColor = vec4(col,1.0);
}
This is the basic structure.
vec2,vec3,vec4are just arrays of thefloatof sizes \(2\),\(3\), \(4\), respectively.fragColoris the output color of the pixel of coordinate uv.length()is a function that returns the magnitude of the vector.iResolutionis called a constant buffer. This specific constant buffer is provided by default from shadertoy and gives the resolution of the used window. There are other constant buffers, too, e.g.,iTime.
Logic is elementary; we set the col (a vec3) to have rgb values of black initially and update it to white if the dist (distance from the origin) is less than \(0.5\).
Running this, you’ll see the circle is more like an ellipse is also not centred.
Hence we update the uv coordinates as such:
uv-=0.5;
To fix the ellipse issue, we change the distance as follows:
float dist = length(uv*iResolution.xy)/min(iResolution.x ,iResolution.y);
Final Result:
Rectangle
How do we make a rectangle?
Just write a function that contains a few if statements like this.
Result:
One can also use Manhattan distance as our distance function like here. I just used some good old matrix transformation for rotating it. Result:
We can also use smooth steps.
Water Shader
A straightforward water shader is just using distortion. We can use a du/dv map and move it to create distortion. We can then add two or three maps to our uv values and mixed reflection and refraction textures to give a satisfying result.
Let’s try to make something more cartoonish.
Meet Voronoi Diagrams.
Voronoi diagrams are excellent. Essentially color of a specific point in a plane depends on its nearest point. This coloring divides the plane into multiple segments.

We can also generalise it to any metric possible, giving aesthetically pleasing results. You only need a set of points and a metric, and for that, there would exist a unique Voronoi diagram.
They are cool do check them out
So let’s make a Voronoi diagram and have the points move! Color it, and there is your cartoonish water shader.
Fire Shader
I decided to use Fractal Brownian Motion on simplex noise for this. Then I added a gradient and have uv.y continuously decreasing, giving the illusion that the fire is moving upwards. Yeah, it’s certainly complicated, so let’s go over them one by one.
Noise is just a pseudo-random number generator where the output is differentiable.
Simplex noise is a type of noise, like Perlin noise. The function noise() in the fire shader generates this.
The Fractal Brownian Motion combines multiple steps of Simplex Noise (or another similar noise function), each with a different frequency and amplitude.
Here is the result left is simplex noise, and right is Fractal Brownian Motion.
We color this and we’re done.
Cel shader
Playing Legend of Zelda is an experience. The graphics are aesthetically beautiful. It just feels different, but why is that? One can tell it is not going for realistic looks but rather making it cartoonish. Graphics that don’t aim to be realistic but try to achieve a style are referred to as stylized graphics.
But before that let’s talk about shading a 3-d object. Most people use Phong Shading; normals are interpolated across polygon faces, and through interpolated normals, we now color the pixel using the new normal. This mathematical trick saves a lot of polygon count as now we can have a realistic-looking surface with a low poly count.
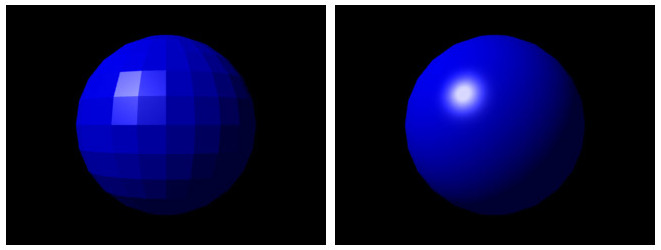
We need to quantise the number of colors it can have. You can even quantise the normal angles if you get the normal data. Here is the final shader